Photographing Butterflies
Paul Chesterfield, ARPS, DPAGB.
Foreword
This article was written way back when digital photography was in its infancy and film was still king. I have updated the main parts to reflect today's technology, but you may still spot some older references. Please do not let this deter you; most of the information here remains valid whatever camera technology you are using.
INTRODUCTION
Nature is all around us, we live within it, we are affected by it, we are a part of it. But how often do we really stop and look at it? From the beauty of tiny butterflies to the grandeur of the natural landscape, nature can uplift us and encourage us to learn more, to explore and to share the wonders that we have been privileged to uncover.
Photography provides us with the means to do all of these things, in a way that is accessible to young and old, fit and infirmed, enabling us to visit, at least in our minds, the beauty that we might otherwise never see.
I wasn’t sure how to approach this topic, but one of my section headings is “Know your audience”, and that is probably as good a place to start as any. Photography is my main interest, and the only reason that I breed butterflies and moths is to photograph them. For those of you approaching this subject from the opposite perspective - primarily an interest in butterflies - I will try to keep the technical bits to a minimum and concentrate on some of the tips and tricks I have learned for getting pleasing butterfly pictures.
WHY PHOTOGRAPH BUTTERFLIES?
Butterflies are beautiful and delicate creatures, but they are usually only seen from a distance and their true beauty is often missed. Even butterfly breeders, with the advantage of direct contact with their livestock, may not have the time to really look at and appreciate the intricate patterns in a wing or the colours of an eye, or be able to share that appreciation with others as they might wish. Photographs enable everyone to see the detail and to enjoy butterflies as the wonders of nature that they are.
KNOW YOUR AUDIENCE
Often overlooked, but important in planning any presentation, is to know your intended audience. Do you want pictures that you can enlarge and exhibit, whether in a public gallery or on your living room wall? Do you want pictures to include as part of a slide show, perhaps for use as an educational tool? Or do you just want a set of postcard-size prints to show to friends and to keep as memories? Different audiences require slightly different approaches, but don’t worry, the basic principles are the same.
THE BASIC ELEMENTS
At its simplest there are arguably four basic elements that enable the photographer to take his or her picture: a subject (the butterfly), a recording medium (the camera sensor), light (whether natural or artificial), and the photographer’s skill.
Things are never quite that simple, of course, and choice of equipment, understanding of the subject, and even plain luck, will all play their part.
THE SCIENCE BIT…
Photography involves the recording of light (the image) on a photosensitive surface (the digital photo-receptor or sensor). The key to a successful picture is control of the light reaching that surface, which is determined by a number of separate but related elements:
- the size of the aperture- the hole through which light enters the camera;
- the shutter speed- the time that the aperture is open;
- the sensitivity of the sensor- the ability of the sensor to record the incoming light;
- the level, i.e., brightness, of the available light.
Getting the best image is a case of balancing these factors (the skill of the photographer also helps, of course!)
The amount of light reaching the sensor will be the same using a large aperture and fast shutter speed as using a small aperture and slow shutter speed. The choice of which combination to use is based on a number of factors that, in close-up photography in particular, can make life difficult. The slower the shutter speed, the more chance there is of a blurred picture due to movement of either the subject or the camera, so faster is better. The wider the aperture, the smaller the depth of field (the distance between the closest and furthest in-focus points) so a small aperture is best for a sharp picture. To achieve the ideal of a fast shutter speed with a small aperture we need plenty of available light, which means either bright natural daylight or artificial flash light.
Sensitivity (usually measured in ISO) is also a factor here, because the more light-sensitive the sensor the higher the shutter speed that can bre used for the same aperture. ISO 100 can be considered a good "base" figure for general purposes, but some cameras can go up to ISO 32,000 and even beyond. The higher the ISO value, the more light is gathered and so higher shutter speeds can be used. However, higher ISO also results in higher "noise" (similar to the grain in film-based photography) which will detract from the image. With my camera I find that ISO 8,000 is a good compromise value, but you should experiment to determine what works best for you.
SO WHAT SORT OF CAMERA DO I NEED?
There is no single answer to this. In the main it depends on what you want to do with your photos. A mobile (cell)phone camera will produce images that are perfectly adequate for uploading to an online photo service such as Flickr or Facebook. If you want to produce small prints that you can hand around, then a reasonable pocket camera will certainly do the job. If you want high-quality images that you can print out and put on your wall, or sell via an image gallery site, you need high-quality photographs. A Digital Single Lens Reflex (DSLR) camera with interchangeable lenses and a high megapixel count (10-20mpx) will arguably provide the sharpest pictures (simply because there are more pixels available to record fine detail).
This is a generalisation, of course, and other factors also have an effect - type of image sensor, amount of in-camera processing, and, probably most importantly, the quality of the lens.
Remember that cameras are improving all the time. When you are ready to buy, decide on your needs and then research online. Read reviews and customer feedback. If possible, when you have narrowed down your list of possibilities, visit a camera store and look at the cameras close up. in my opinion there is nothing like actually handling a camera to tell you if it is the one for you ... are the controls easy to reach and operate? will it be comfortable to carry around for long periods? what accessories will you also need to buy? - DSLRs often come with "kit" lenses, but these tend to be jack-of-all-trade lenses and are seldom high-quality. You will probably need a separate macro lens for a specialty subject like butterfly photography
CLOSE-UP ACCESSORIES
Most photography happens at distances between perhaps six feet and infinity, and most lenses are designed to operate best over this range. Close-up photography requires that the lens be able to focus much closer, down to a few inches. This is achieved by moving the lens elements away from the camera, which moves the plane of focus closer to the camera, magnifying the image. If a 50 mm DSLR lens is moved out 50 mm from the camera it will focus down to 1x magnification, in other words the image on the film will be life size. This is more than adequate for most butterfly photography, where a magnification of 1/3 to 1/6 life size on the film is more usual.
If you have a compact or digital camera with a close-up setting, the camera does the work for you. The quality may not be the best, but it should be adequate for most purposes. If you have an DSLR camera, the cheapest way to get close-ups is to buy a close-up filter which fits in a filter holder in front of your standard lens. For better quality results, extension tubes can be fitted between the camera and the standard lens, usually maintaining any electronic linkages between camera and lens. The best quality is achieved using a true “macro” lens, whose optics are optimised for this type of photography.
Which close-up accessory to use? A butterfly may be anything from 1 cm to 15 cm or more in size and, if you wish (as I do) to show the butterfly in its environment, the field of view needed will be even greater. Combine that with the need for flexibility to quickly respond to any movement of your subject, and I would always recommend a macro lens.
KEEPING THE CAMERA STEADY
One of the worst enemies of the close-up photographer is camera shake, since the slightest movement will be magnified at close range. Unless you have a very steady hand, the best way to steady the camera is to use a sturdy tripod. Even clicking the shutter will move the camera, so a cable release is also advisable. If you don’t fancy carrying a tripod around, consider a monopod as a compromise between stability and manoeuvrability. Even a simple bean bag to rest the camera on will help - assuming you have somewhere to rest the bean bag!
LIGHTING
Light is probably the most important element in photography. Fortunately modern cameras have inbuilt light meters that make it relatively easy to get the correct exposure, but the photographer is still faced with some decisions that will affect the finished picture. Perhaps the main one is what type of lighting to use.
- Natural light – Daylight is the best light to photograph by, because it is the light that we all see by. Pictures taken in natural light look- well, natural, because the colours and the relationship between light and shadows are taken from the real world. Natural light even has its place in the more controlled world of indoor photography, but here it tends to be more directional – for example light coming in at a window. To avoid deep shadows, mirrors or white reflectors can be used to “throw” light back into the shadow areas.
- Flash light - There will be times when natural light isn’t the answer, especially when photographing in “the wild". Here the slightest movement from subject or breeze can ruin the picture (when the field of view is measured in millimetres it doesn't take much movement to blur things) so flash lighting may be the answer. Flash photography is also the best way to photograph insects in flight, although that is a rather specialised area of photography. Be careful with flash though, as it can cause deep shadow areas. If you want a natural-looking picture the trick is to hide the fact that flash has been used.
The most straightforward set-up is a single flash mounted on the camera, and many compact cameras have a built-in flash. The problem is that a single flash can create deep shadows, which looks plainly false. Additional flash guns or reflectors can be used to throw light back into the shadow areas to overcome this. A less cumbersome method is to use a specialist ring-flash unit, a circular flash gun that fits over and around the end of the lens. Ring flash guns give a very even, all-over light and are ideal for photographing small, flat subjects such as postage stamps. Butterflies are three-dimensional, however, and need directional side lighting to bring this out. To partially overcome this limitation, some ring flash guns have two semicircular flash tubes that can be controlled individually. However, I would only advise using ring flash for natural history photography as a last resort.
PICTORIAL & COMPOSITIONAL “RULES”
I know to my cost that it is easy to get carried away when taking pictures, but a little care now will avoid spoilt pictures later. The most important part of the picture is the subject, the butterfly, and to show it at its best there are a few simple guidelines that you can follow.
- The butterfly itself should be sharp and in focus. Because the depth of field is likely to be limited, try to photograph the butterfly at right angles – side-on if wings closed, from above if wings open. If you can’t get it all in focus, as with all “portrait” photography the eyes are the most important area to focus on.
- Foreground objects should be there to enhance and support the composition, but they should not be prominent enough to divide the viewer’s attention. A little “gardening” to remove dead leaves or other distractions can be worthwhile if you can do so without disturbing the butterfly.
- Backgrounds should be visible enough to give a feeling of the environment, but muted enough not to draw the eye away from the subject. There is no point in taking a crisp, sharp close-up picture of a beautiful butterfly if the surroundings are so gaudy that it cannot be appreciated.
- A useful guide to a pleasing composition is the “thirds” rule, which says that a subject positioned a third of the way into a picture makes a more pleasing composition than if placed right in the middle. Another guide is that a strong diagonal, say a butterfly’s wing, attracts the eye and makes a picture more striking.
- Always check in the corners! It is very easy to be concentrating so hard on the main subject that you miss that distracting bright area in the background.
Of course these are only guidelines, but in my experience there is a lot of truth behind them and they should always be at the forefront of the photographer’s mind. There are always exceptions to any rule, however, and I have seen some excellent pictures that break every one. Unfortunately the human eye is very good at spotting when a composition is not quite right, and while this may not be recognised consciously, on a sub-conscious level it can spoil the effect of the picture. It is very annoying to find an otherwise good picture spoiled by something that could have easily been avoided at the time.
TAKING THE PICTURE - LOCATION
Where you take your photographs will depend on what you want to achieve, and of course on what locations are available to you. In broad terms there are three main environments in which you may decide to photograph butterflies.
- The natural environment – photographing butterflies in their natural environment requires patience (lots of patience!) and a fair degree of luck. A photographic 'butterfly safari' is like any other - you must know where your subject is likely to be found, but when you get there you may be disappointed. If you have a lot of camera equipment, buy a well-padded, mid-size camera bag and fill it with the necessities plus a few extras that will fit in. Don’t forget to include plenty of film, film is not that expensive and it would be a shame to run out at the wrong time.
- The 'studio' environment – by 'studio' I mean any controlled environment where the main problems found in outside photography can be avoided. Most of my own pictures are taken in natural (window) light on an indoor tabletop. This shares several elements with a photographic studio - lighting is controlled (to a degree at least); background and foreground elements are added; and the subject is posed (more or less) where the photographer wants him, her or it to be. This approach is ideal for photographing chrysalises or caterpillars.
- The butterfly farm – this may be where many of you will wish to take your butterfly photos, especially if you are lucky enough to have your own butterfly enclosure. Bear in mind the “rules” for subject, foreground, background and composition. If shooting through netting, get close up to the netting so it is thrown right out of focus and becomes less apparent. Watch out for bright or colourful things on the other side of the enclosure, they can be a distraction in the final photograph.
In the UK, where butterfly releases have yet to catch on, butterfly farms tend to be large heated greenhouses where the general public pay their money to go in and walk around, marvelling at the many different species of butterfly flying around them. Such farms have the advantage of having many free-flying species in a relatively small area. Unfortunately they also tend to be hot and humid, not ideal conditions for the electronics in a camera, and it is best to let the camera warm up for at least 15 minutes before taking any pictures or opening the camera back. This is a good time to have a look around at the layout of the area and the species that are in evidence. While the environment is enclosed, there is still plenty of room for your chosen subject to be elusive if it wishes. Another problem is that there are other people around, and a background that is muted one minute may have a brightly coloured shirt in it the next, so be alert. If you are using a tripod, try to visit when there are few other people around so they don’t get in your way or you in theirs. If possible check with the owner to make sure that there are no legal restrictions (someone who trips over your tripod may sue!). Also there may be restrictions on any commercial use of your pictures.
THE FINISHED PHOTOGRAPH
Having taken your photograph, what will you do with it? Here are a few tips of my own. Keep a record of what you have photographed, along with other details such as where and when, so that you can refer back if need be. Back up your images onto DVD or something similar, just in case you need to go back to therm later.
If you wish to produce a mounted print for wall display, choose a print medium that will not fade over time. If your purpose is to produce illustrations for brochures or books, there are professional print houses that can help you, albeit at a price. If you have a computer, why not try doing it yourself? Today’s generation of powerful personal computers are ideal tools for quickly processing photographic images. The tools that they provide enable the user to do things that take a great deal of skill, time and effort in a photographic darkroom, and their widespread use brings these abilities to a much wider range of people that ever before. Photo printers have also improved markedly, especially in the fade-resistant quality of their inks.
AND FINALLY...
I hope that this has been of some help, or has at least provoked some thought. And please don’t be put off by the technicalities. The main thing to remember is that, whatever your reason for photographing butterflies, and whatever anyone else says or thinks, if you can produce photos that you like and enjoy, then you have been successful. And if you can share your enjoyment of butterflies with others through your photographs, then they can also share in that success.
Paul Chesterfield
26 November, 2000 (revised 2012)
Here are some pictures to accompany the text. (Click on a butterfly to see enlargement)
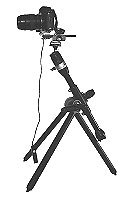 Camera with macro lens, tripod & cable release |
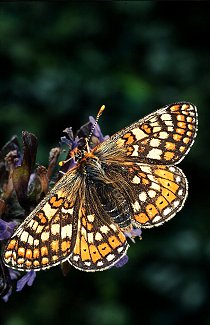 Marsh Fritillary butterfly |
 Tiger Swallowtail butterfly |
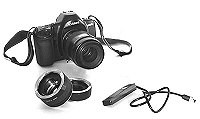 Camera with standard lens, extension tubes (one on camera) & cable release |
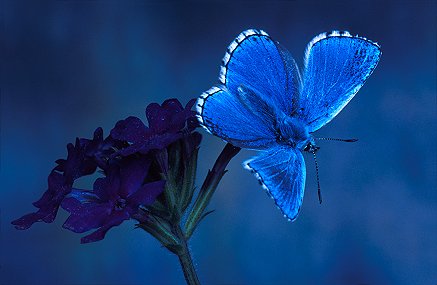 Adonis Blue butterfly |
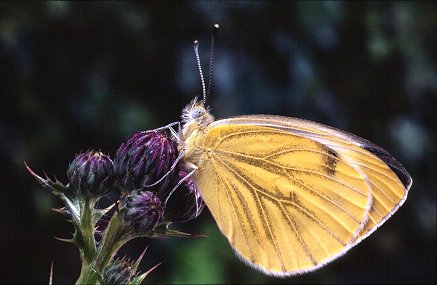 Green-veined White butterfly |
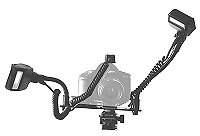 Twin-flash guns on bracket |
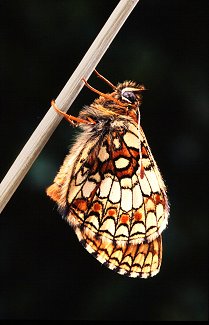 Heath Fritillary butterfly |